I just finished working my ass off renovating an older house I bought earlier in the year. Here are the before, during, and after pictures. This post doesn't have any philosophy except for that I wouldn't have finished the project if I hadn't been reading the Stoics in the evening...
Part 1:
The house had been sitting unoccupied since 2014. I got the water turned on and there were two leaks (so I thought). Water came gushing though a wall and under the sink. I fixed the leaks then turned the water back on. I double checked my work for leaks. Everything seemed fine.
I came back a few days later and the floor was covered in water. WTF?
It turns out there was a leak AND a drainage problem with the dishwasher. The valve to the dishwasher was leaking water into the dishwasher. Not a problem on its own but a problem if the dishwasher isn't draining.
I didn't identify the problem because with the small leak it takes about 30 min for the dishwasher to fill up and overflow. I didn't stick around for 30 min after turning the water back on...
I couldn't just replace the laminate flooring because the substrate had been warped by the water.
Part 2: Remove the Flooring
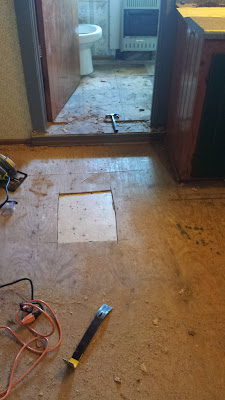
You can't install flooring on a warped substrate so I had to take that out too.
SURPRISE!
Under the substrate there was another floor.
Also wet.
I took that floor out plus its substrate (which was also wet and warped).
 |
| Otis helping. |
I took the particle board out only to find another plywood substrate...
Under the plywood was another linoleum floor.
And under that floor was another linoleum floor...
At this point I feel like I'm in some sort of twisted comedy. After several days of removing floors, all I can do is laugh...and say "fuck it." I'm not removing any more floors.
Part 3: The Bathroom Saga Begins
I needed a break from dealing with the floors if I wanted to preserve my sanity. I figured I'd move to the bathroom. I can't remember why, but for some reason I dumped a bucket of water into the tub. I then noticed that 30 seconds later the adjacent closet floor was covered in water.
Not good.
So much for my sanity.
I decided to pull up the subfloor next to the tub to try to see what was going on:
 |
| I'm no expert, but I think there's a leak... |
The (correction: "A") problem was that the tub drain assembly had completely rusted out where it attaches to the main drain
If I can just pull out the tub drain assembly and replace it, we're good to go...
That's not going to work since the threads are completely gone.
I know! I'll cut the cast iron knuckle off, replace it with a rubber one then install a new assembly...
Gonna have to remove some sub-floor first for access...
Umm....WTF? This is my drain pipe for the tub....
Ok, so I'm going to have to take the pipe out but the only way to do that is to remove the cast iron tub...and the only way to do that is with a sledge hammer.
Some pictures before the demo...
 |
| So beautiful... |
 |
| My helper... |
Ok, pipe's out. New rubber sleeve installed.
The problem now is that no modern tubs fit in the space. It's too small. I'm going to have to build a custom shower...
 |
| Pex water lines for shower. |
Put in proper frame. For a shower you need to use 1/2" concrete board on the wall. That plus the weight of the thinset and tile requires you secure studs to the concrete wall.
 |
| Otis just sleeps while I work. He's not bothered by anything. |
This is called a pre-slope. It's the "pre" shower pan. If water makes it through the shower pan, this layer will direct water to the drain rather than have it sit and accumulate. The concrete slopes toward the drain weep holes.
Below is the shower pan. On top of the pre-slope you install a shower pan liner. Over the liner you pour concrete and slope it 1/4" per foot to the drain. It should be about 3/4" thick at the drain so slope up from there.
Installing the concrete board.
Don't let the walls sit on the pan. If water makes it through to the pan and the walls are sitting on the floor, they will suck the water up. Leave about an inch gap.
There are at least 3 ways to make a shower curb. Most start by stacking three 2x4s. I've covered my curb in mortar which will eventually be covered in waterproofing then thinset then tile. Shower curbs are a weak point. Have multiple layers of protection.
Put concrete board on the rest of the bathroom floor. Current building codes require all areas near water to have concrete board as a substrate. Unlike in drywall, mold can't grow in concrete.
Waterproof all the seams and screws with waterproofing product.
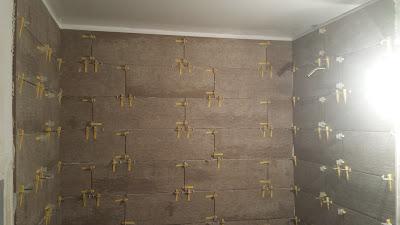
Tile the middle wall first. Don't tile the bottom row. (I'll explain later). I've used a leveling system to ensure my tiles are perfectly flat. Any imperfection will cause your shower to fail. If there is "lipage" between tiles, that's where the water will get behind the wall eventually causing your tiles to fall off.
Install the floor before doing the bottom row. The reason for this is that the shower floor is often uneven due to the slope. If you align your first row with the floor then all you walls will be off. Using a level, I temporarily attach a strip of drywall above my shower liner. I build my first row of tiles from there. Once the walls and floor are done then I custom cut each tile on the bottom row to conform with the contours of the floor.
After grouting and sealing, here is the finished product:
Part 4: Completed Bathroom:
I installed the pedestal sink. Let me just note that pedestal sinks are absolute hell to install but I didn't have room for a cabinet.
 |
| That's a good lookin' shower. Bushed nickel.... |
 |
| Tired but victorious |
 |
| New toilet. |
 |
| Sink from Hell |
Part 5: The Kitchen
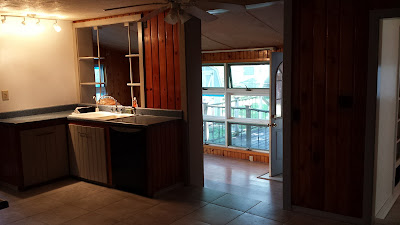
For the kitchen, bathroom, and laundry room I installed 18x18 inch tile. Next year I'm putting in black countertops with grey speckles plus a backsplash. The appliances will all be black.
Part 6: Final Walk-Thru


packers and movers in chembur
ReplyDeletepackers and movers in kharghar
packers and movers in santacruz
packers and movers in khar road
packers and movers in wadala